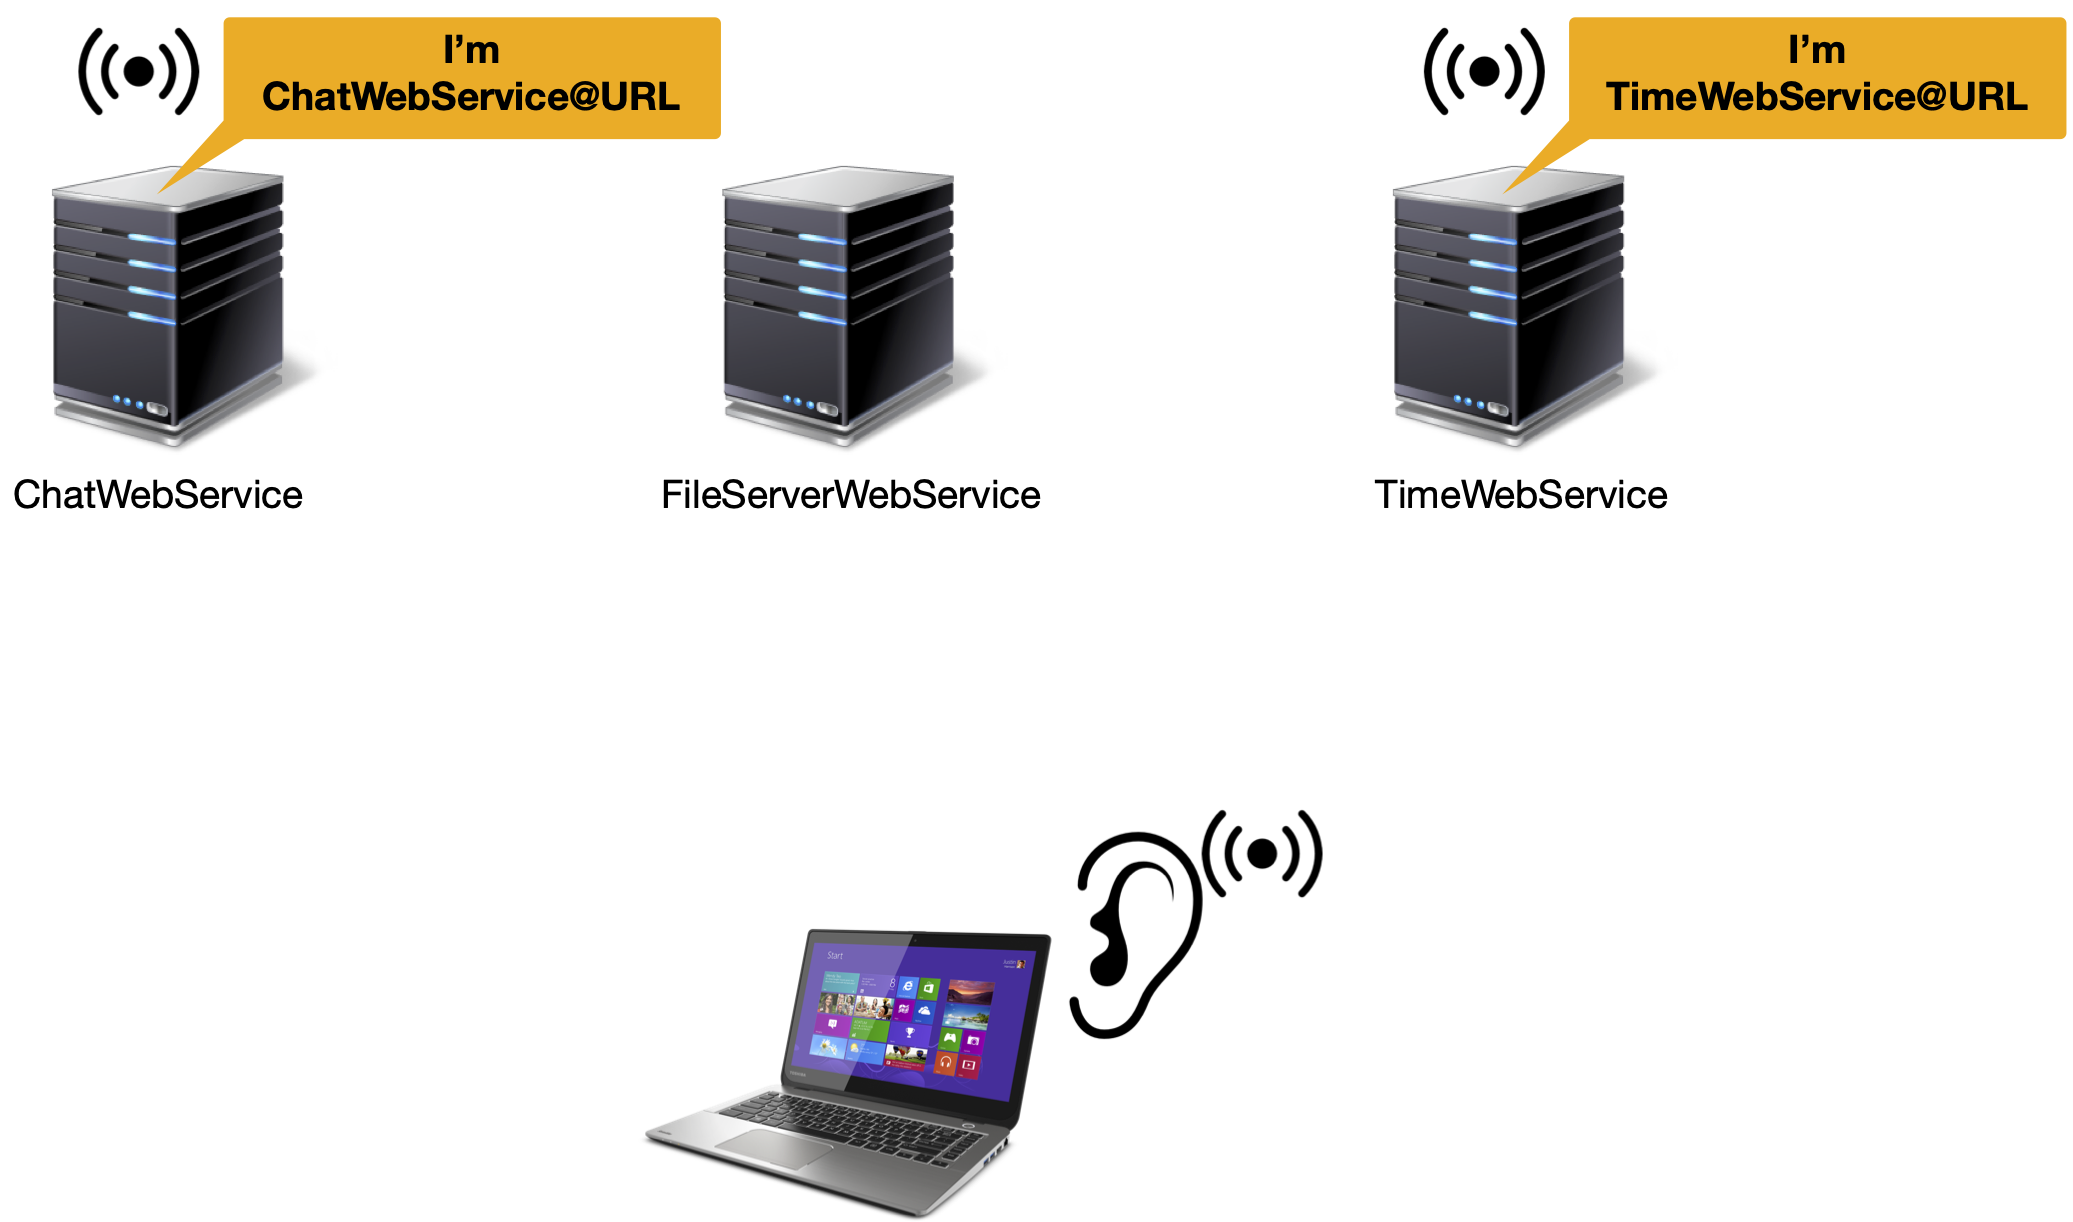
Docker Engine (1)
The docker daemon (server) manages Docker objects, such as images, containers, networks, and volumes
The docker client sends CLI requests to docker daemon
Note:
We will be using maven for building all projects in this course.
When using your preferred IDE, make sure you use the option to import the code provided as a Maven project.
Maven is a software project management tool used for building Java projects.
Its main advantage is that it simplifies the use of dependencies (libraries) needed by a program.
Maven can also perfom the various steps in the development cycle, from compilation, packaging and installation of a Java application.
<project xmlns="http://maven.apache.org/POM/4.0.0" xmlns:xsi="http://www.w3.org/2001/XMLSchema-instance" xsi:schemaLocation="http://maven.apache.org/POM/4.0.0 https://maven.apache.org/xsd/maven-4.0.0.xsd">
    <modelVersion>4.0.0</modelVersion>
    <groupId>sd2324-lab1</groupId>
    <artifactId>sd2324-lab1</artifactId>
    <version>1</version>
    <properties>
        <!--List of properties-->
    </properties>
    <build>
    	<sourceDirectory>src</sourceDirectory>
    	<plugins>
            <!--List of plugins-->
    	</plugins>
    </build>
    <dependencies>
            <!--List of dependencies-->
    </dependencies>
</project>
Maven uses the information contained in the pom.xml file to produce an artefact.
<groupId>sd2324-lab1</groupId>
    <artifactId>sd2324-lab1</artifactId>
    <version>1</version>
The elements above identify the artefact, which can be used as a dependency in other projects.
A POM can also contain a properties, which can be referenced in other parts of the pom.xml.
<properties>
    <project.build.sourceEncoding>UTF-8</project.build.sourceEncoding>
    <authors>xxxxx-yyyyy</authors>
</properties>
Replace xxxxx-yyyyy with your group members student numbers.
<plugin>
    <artifactId>maven-compiler-plugin</artifactId>
    <version>3.12.1</version>
    <configuration>
        <source>17</source>
        <target>17</target>
    </configuration>
</plugin>
We will use Java 17. You may need to install a suitable JDK (>= 17) and update your IDE to be compatible with Java 17 sources.
<plugin>
    <artifactId>maven-assembly-plugin</artifactId>
        <configuration>
            <archive></archive>
            <descriptorRefs>
                <descriptorRef>jar-with-dependencies</descriptorRef>
            </descriptorRefs>
        </configuration>
</plugin>
Used to package the project code into a single .jar file together with any libraries it requires.
<plugin>
    <groupId>io.fabric8</groupId>
    <artifactId>docker-maven-plugin</artifactId>
    <version>0.44.0</version>
    <configuration>
        <images>
            <image>
                <name>${project.artifactId}-${authors}</name>
                <build>
                    <dockerFile>${project.basedir}/Dockerfile</dockerFile>
                </build>
            </image>
        </images>
    </configuration>
</plugin>
This plugin will use the instructions contained in the Dockerfile, located in the root of the project, to generate a docker image.
Note that the name of the docker image will be made of the artifactId and the authors property.
Important: The plugin fails if Docker is not already running or is not properly configured. Make sure you can run docker without root privileges.
<dependencies>
    <dependency>
        <groupId>com.google.guava</groupId>
        <artifactId>guava</artifactId>
        <version>33.0.0-jre</version>
    </dependency>
</dependencies>
A Maven project can include external libraries as dependencies.
Maven will pull the necessary jars (or code) from a repository automatically when the project is built.
For example, Guava is a library that provides many interesting data structure and utilities types, such as caches.
mvn clean - cleans the project, removing generated files
mvn compile – compiles the project
mvn assembly:single – creates a single jar file with all the compiled classes and dependencies
mvn docker:build – builds a docker image using the Dockerfile in the current directory.
Note: you can run all at once, by doing:
mvn clean compile assembly:single docker:build
Docker is a system/platform for running applications using container technology.
Docker allows multiple services, with multiple instances, to be deployed in the same host computer (cheaply).
Docker will be used to deploy and test the distributed systems that will be developed during this course (eg., exercises and the two project assignments)
Containers execute isolated from the other containers, as if each was running in a dedicated machine, with its own dedicated storage and separate networking stack.
Usually, a container includes all software necessary to run a given application or service and only that.
The docker daemon (server) manages Docker objects, such as images, containers, networks, and volumes
The docker client sends CLI requests to docker daemon
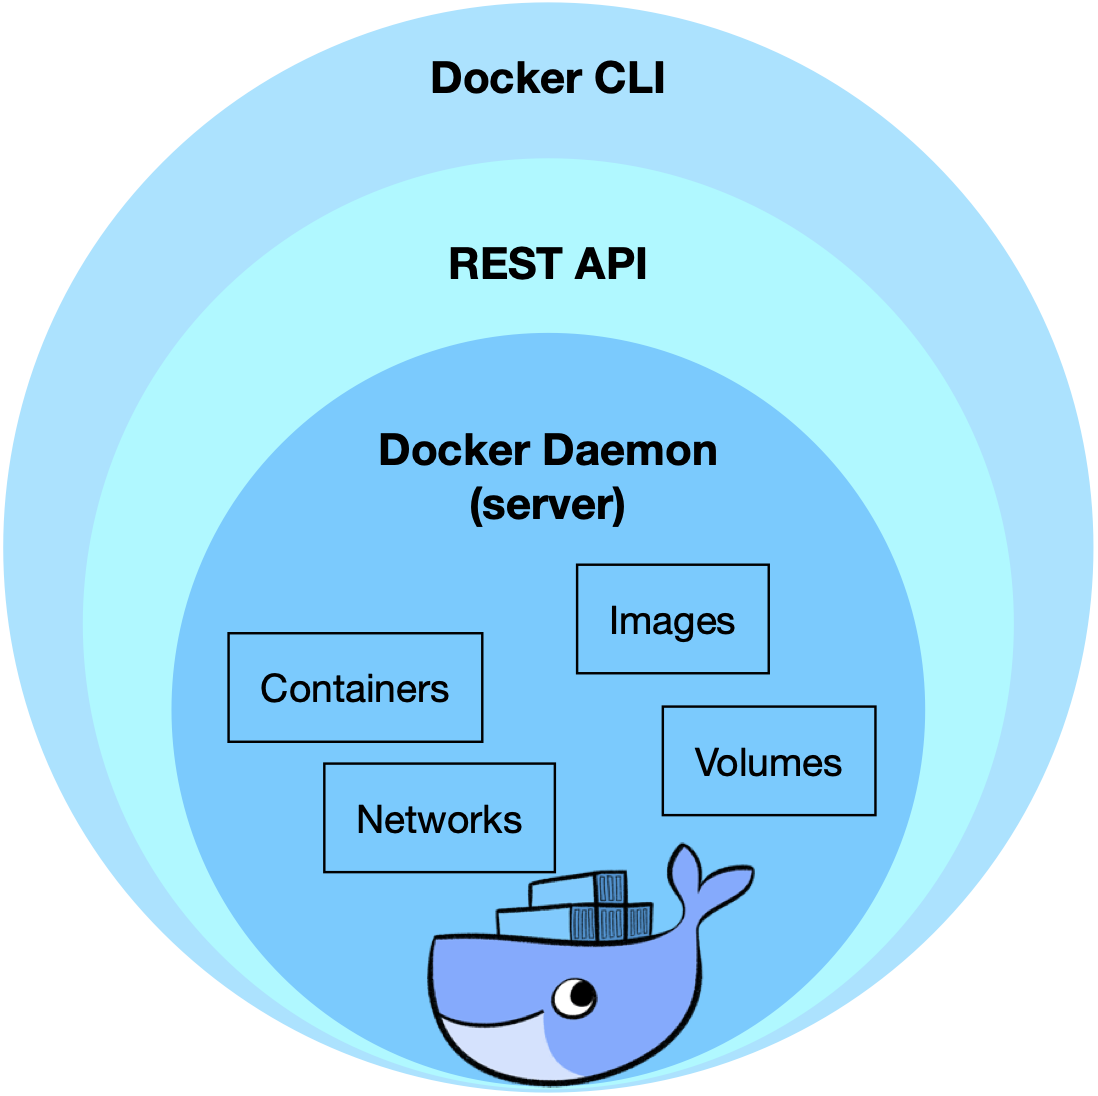
A docker registry stores Docker images. Docker is configured to search in Docker Hub by default
An image is a read-only template with instructions for creating a Docker container
Often, an image is based on another image, with some additional customization.
A Docker image can be created from the specification in a Dockerfile.
FROM ubuntu

RUN apt-get update && apt-get install iproute2 -y

ENV JAVA_HOME=/opt/java/openjdk
COPY --from=eclipse-temurin:17 $JAVA_HOME $JAVA_HOME
ENV PATH=$PATH:$JAVA_HOME/bin

WORKDIR /home/sd

COPY target/*jar-with-dependencies.jar sd.jar
Notes:
FROM specifies which image will be extended to create the new image. In the example, openjdk:17 is the official openjdk 17 image
RUN executes commands in the image, for example to install more packages and software
ENV defines or modifies an environment variable
WORKDIR defines the working directory to be used in the following instructions
COPY copies a file or files to the docker image
The full specification with supported commands is available here.
There are multiple ways to run containers...
docker run -d sd2324-lab1-xxxxx-yyyyy runs the default executable in background
docker run -ti sd2324-lab1-xxxxx-yyyyy runs the default executable in the foreground with a an interactive terminal (shell)
docker run -ti sd2324-lab1-xxxxx-yyyyy /bin/bash overrides de default executable to run a different executable
Several other options are possible to customize the running of containers. See docker run for the full details.
By default, all containers started in a machine will be able to connect to each other through a virtual network.
Each container is assigned an IP and a hostname. The hostname is only known locally.
The hostname can be changed using the –h option, as show below:
docker run -h myhostname sd2324-lab1-xxxxx-yyyyy
It is possible to create a bridge network that connect containers in a machine with hostname resolution.
To create a bridged network named sdnet, run:
docker network create -d bridge sdnet
When running the container, specify the network (--network sdnet), the name and hostname (--name srv1 -h srv1):
docker run -h srv1 --name srv1 --network sdnet sd2324-lab1-xxxxx-yyyyy
docker ps [OPTIONS]
docker ps lists running containers
docker ps -a lists all containers, including stopped containers
docker exec [OPTIONS] <container> <cmd> to execute a command in a running container
docker logs -f <container> fetch the logs of a running container
docker kill <container> to kill a container
docker rm -f <container> to kill and remove a container
docker system prune to free disk space used by docker
docker images lists docker images cached locally
docker pull caches an image locally, pulling from the Docker hub
docker push uploads an image to the docker hub (requires an account)
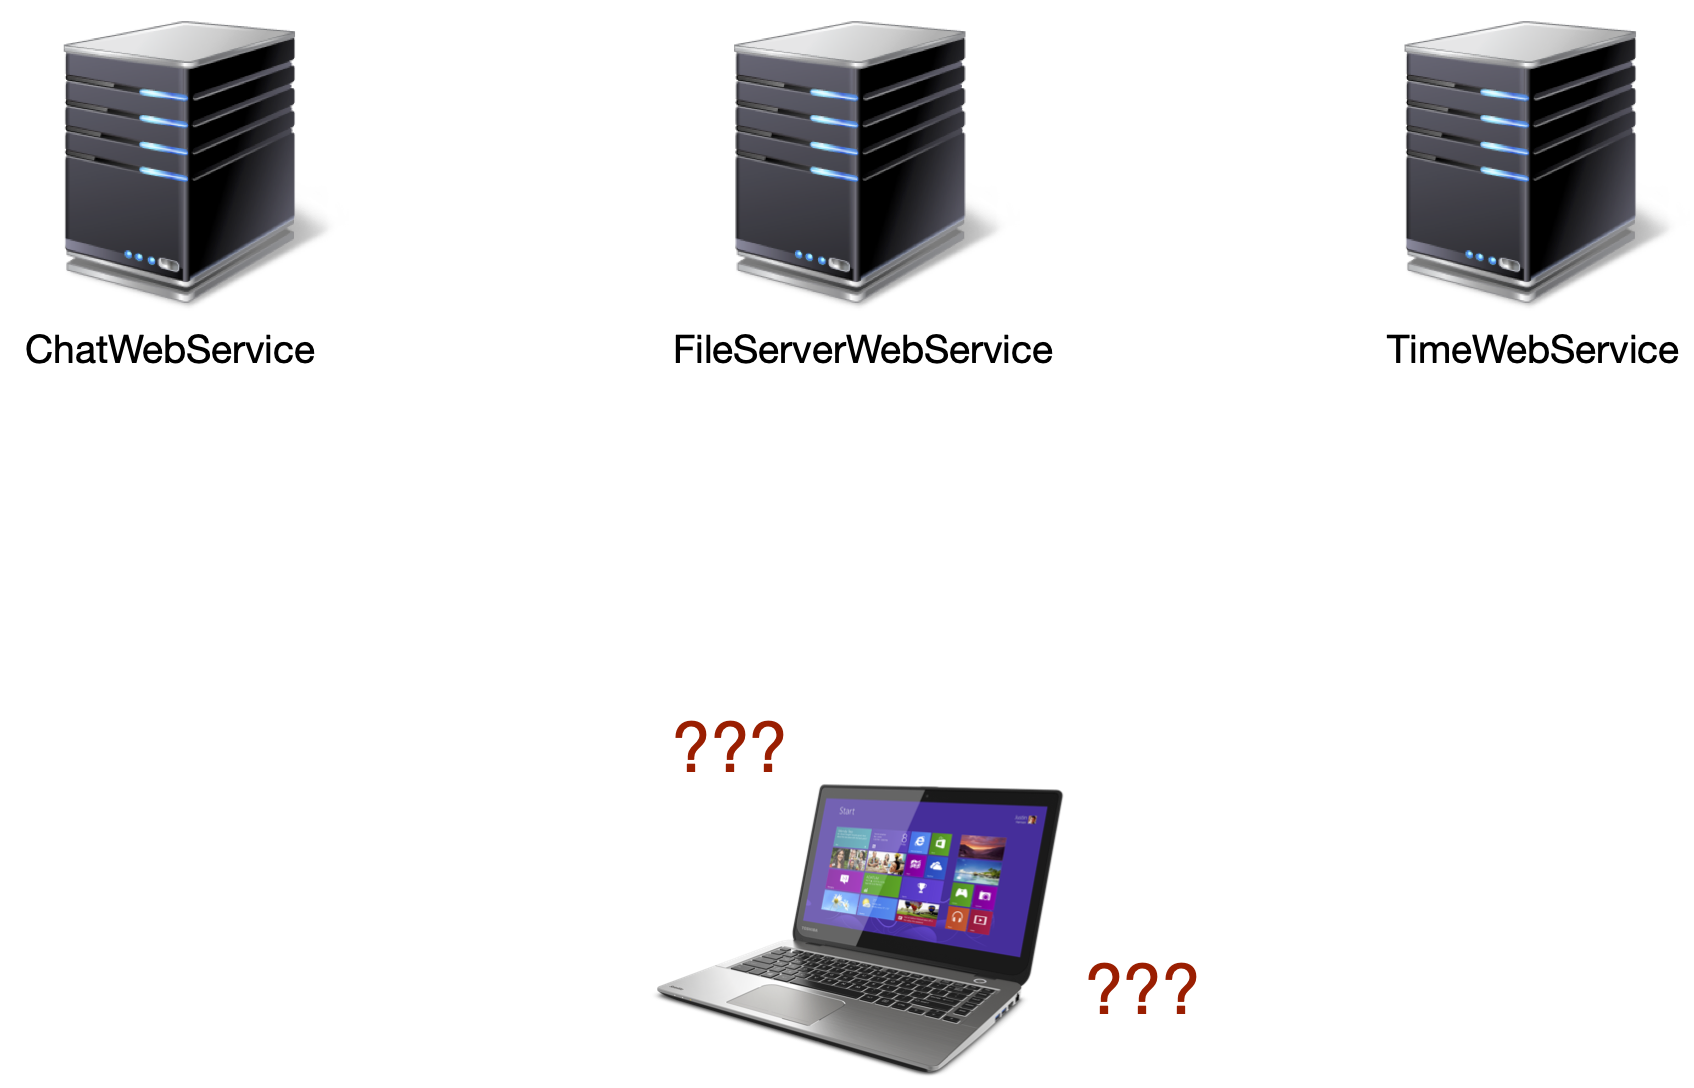
IP multicast allows sending the same UDP message to multiple processes (normally, only in the same local network).
Like unicast UDP, the IP Multicast service is best-effort (unreliable); the key difference is the message is addressed to a group address, instead of to an unicast IP.
The client sends a discovery request asking the location of a service using IP multicast.
The request is retransmitted as needed to account for communication failures.
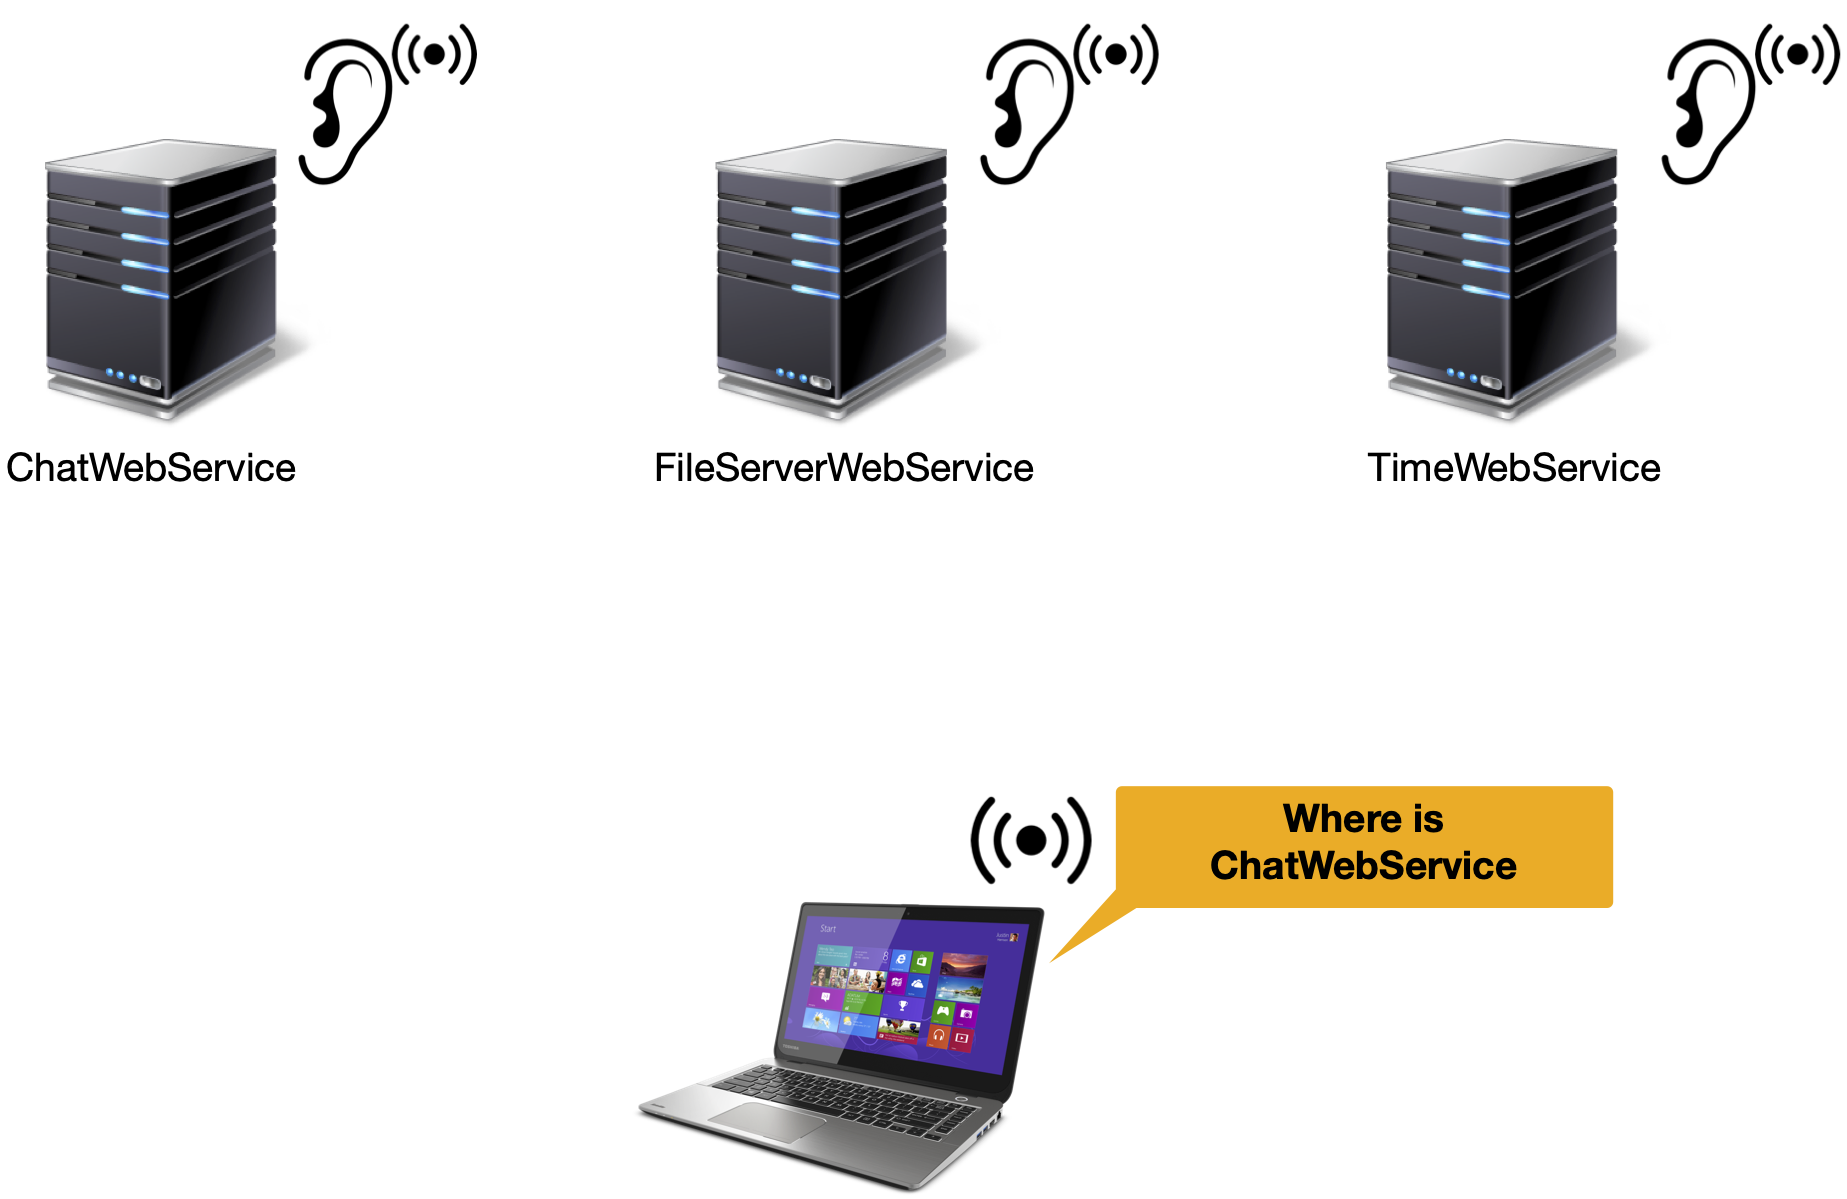
Note that in both cases, the IP group address and port needs to have been agreed upon previously.
We will use server initiated discovery in this course.
It will allow us to build distributed-systems that self-organize.
The goal is to avoid the need to manually supply IP addresses and ports at runtime.
public interface Discovery {

    /**
     * Used to announce the URI of the given service name
     */
    public void announce(String serviceName, String serviceURI);

    /**
     * Get discovered URIs for a given service name
     */
    public URI[] knownUrisOf(String serviceName, int minReplies);

    /**
     * Get the instance of the Discovery service
     */
    public static Discovery getInstance() {
    	return DiscoveryImpl.getInstance();
    }
}
class DiscoveryImpl implements Discovery {
    private static Discovery singleton;

    synchronized static Discovery getInstance() {
    	if (singleton == null) {
    		singleton = new DiscoveryImpl();
    	}
    	return singleton;
    }
The singleton pattern is meant to only allow a single instance of a class in the same Java process.
Uses a background thread for sending the periodic announcements to the IP multicast group and port.
@Override
public void announce(String serviceName, String serviceURI) {

    var pktBytes = String.format("%s%s%s", serviceName, DELIMITER, serviceURI).getBytes();
    var pkt = new DatagramPacket(pktBytes, pktBytes.length, DISCOVERY_ADDR);

    // start thread to send periodic announcements
    new Thread(() -> {
        try (var ds = new DatagramSocket()) {
            while (true) {
                try {
                    ds.send(pkt);
                    Thread.sleep(DISCOVERY_ANNOUNCE_PERIOD);
                } catch (Exception e) {}
            }
        } catch (Exception e) {}
    }).start();
}
Notice the format of the announcements...
A background listener threads listens for announcements and stores them...
private DiscoveryImpl() {
  this.startListener();
}
private void startListener() {
  new Thread(() -> {
    try (var ms = new MulticastSocket(DISCOVERY_ADDR.getPort())) {
      ms.joinGroup(DISCOVERY_ADDR, NetworkInterface.getByInetAddress(InetAddress.getLocalHost()));
      while(true)
          try {
            var pkt = new DatagramPacket(new byte[MAX_DATAGRAM_SIZE], MAX_DATAGRAM_SIZE);
            ms.receive(pkt);
            var msg = new String(pkt.getData(), 0, pkt.getLength());
            // TODO: decode and store this information...
          } catch (Exception x) {}
    } catch (Exception x) {}
  }).start();
}
public URI[] knownUrisOf(String serviceName, int minEntries) {
  // TODO: use already stored annoucements,
  // or wait if necessary to have the number of entries requested...
}
https://preguica.github.io/sd2324/praticas2324/lab1/sd2324-lab1.zip
Download and import the provided code to the IDE
Make sure the project is configured as a Maven project.
Build the image (run in a terminal in the project folder):
mvn clean compile assembly:single docker:build
Create the docker network sdnet
docker network create -d bridge sdnet
Run the container and access its shell terminal.
docker run -ti --network sdnet sd2324-lab1-xxxxx-yyyyy /bin/bash
Try some commands, such as:
lspwdip addrjava -versionComplete the Discovery service implementation
Complete the provided TCP server and client to use the Discovery Service
Run the TCPServer
docker run -t --network sdnet sd2324-lab1-xxxxx-yyyyy java -cp sd.jar lab1.TcpServer
Run the TcpClient
docker run -ti --network sdnet sd2324-lab1-xxxxx-yyyyy java -cp sd.jar lab1.TcpClient